在命名空间区域中使用using使用其它的命名空间,如果两个命名空间都存在同样的类名,会优先本命名空间区域内的且不会发生冲突。
namespace XLCH
{
    using XZMJ;

    public UICard card;
}
例如上面的例子,UICard在XLCH存在且在XZMJ也存在,将会使用的是XLCH自家命名空间的,和XZMJ的不发生冲突,不用在类名前指定命名空间。
public static string CalMd5(byte[] datas)
{
    //功能类 在System.Security.Cryptography命名空间中
    MD5 md5 = new MD5CryptoServiceProvider();
    byte[] ret = md5.ComputeHash(datas);

    StringBuilder sb = new StringBuilder();
    for (int i = 0; i < ret.Length; i++)
    {
        //表示占两个字符的16进制
        sb.Append(ret[i].ToString("x2"));
    }
    return sb.ToString();
}
private static void CopyDirectory(string sourceDirPath, string saveDirPath)
{
    try
    {
        if (!Directory.Exists(saveDirPath))
        {
            Directory.CreateDirectory(saveDirPath);
        }
        //复制文件
        string[] files = Directory.GetFiles(sourceDirPath);
        foreach (string file in files)
        {
            string pFilePath = saveDirPath + "/" + Path.GetFileName(file);
            if (File.Exists(pFilePath)) continue;
            File.Copy(file, pFilePath);
        }

        //递归调用文件夹复制
        string[] dirs = Directory.GetDirectories(sourceDirPath);
        foreach (string dir in dirs)
        {
            CopyDirectory(dir, saveDirPath + "/" + Path.GetFileName(dir));
        }
    }
    catch (Exception e)
    {
        UnityEngine.Debug.LogError(e.ToString());
    }
}
在网上看到的有一大堆解析,有什么前者对比栈中的值,后者对比堆中的内容的,或者是说对比什么地址的,对比内容的,我靠,真的被绕成煞笔了。
在不考虑所有的重写的情况下,==和equal其实是不是相同的!
object a = new object();
object b = new object();
Console.WriteLine(a == b);//false
Console.WriteLine(a.Equals(b));//false

int i = 1;
int ii = 1;
Console.WriteLine(i == ii);//true
Console.WriteLine(i.Equals(ii));//true

Console.ReadKey();
从上面例子中,引用类型和值类型的==和equal对比结果都是一样的,据我猜测都是对比的栈中的数据,不管是地址还是数值或者其他,反正就是直接对比的栈数据,一样就是true,不一样就是false,应该没有那么复杂。
a和b栈中保存的是两个不同的地址,所以它们不相等;i和ii栈中的数据都是1,所以它们是相等的。
如果想要其它方式的对比,可以重写Equal方法或则重载==,定制成你想咋样就咋样,想对比引用数据的内容就对比内容。最明显的例子就是String类型,它是一个引用类型,但是它重载了==和重写了Equal,实际对比的是字符串中的每一个字符。
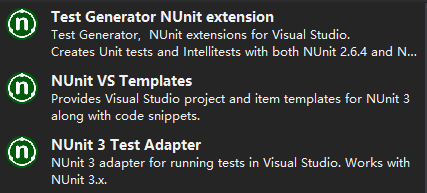
在VS的工具->扩展和更新中选择联网搜索NUnit,下载这三个:

创建项目,引入NUit.Framework.dll,你可以在安装NUint的目录中找到它,也可以在NuGet中获取它
引入后,右键项目,添加-》新建项-》Test-》NUnit Test Fixture,你就会创建一个单元测试的文件
[TestFixture]//表示这个类为单元测试类
public class TestClass1
{
    Program p = new Program();//我需要测试的类
    [Test]//标志方法为单元测试方法
    public void TestMethod()
    {
        for (int i = 0; i < 100000000; i++)
        {
            p.IsValid(i);//我的测试方法
        }
        Assert.Pass("Your first passing test");//表示测试通过
    }
}
Assert断言确定测试的通过还是不通过
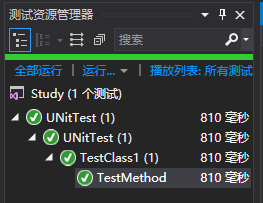
好了,在菜单测试-》窗口-》测试资源管理器,打开测试窗口

你可以全部运行,也可以在测试类中,右键测试方法-》运行测试,单独测试一个方法。
public delegate void TestDeleteType();
class Program
{
    private static TestDeleteType dd = null;
    static void Main(string[] args)
    {
        dd = Delegate.Combine(dd, new TestDeleteType( HaHa1)) as TestDeleteType;
        dd();//HaHa1

        Action a = null;
        a = Delegate.Combine(a, new Action(HaHa1)) as Action;
        a();//HaHa1
        //a = Delegate.Combine(a, dd) as Action; 异常,必须要有相同的类型
        //a();

        Console.ReadKey();
    }

    static void HaHa1()
    {
        Console.WriteLine("HaHa1");
    }
}
可以使用Delegate.Combine()整合多个同一样类型的委托,可以看出作为参数的委托是可以为空的,返回一个Delegate类型,需要自己转换一下
也可以使用+直接联合委托,注意委托类型一定需要一致,如果有返回值,就只返回最后注册的函数的返回值。
[AttributeUsage(AttributeTargets.Field|AttributeTargets.Class, Inherited = true, AllowMultiple = true)]
public class MyAttribute:Attribute
{
    public int Index;

    public MyAttribute(int index)
    {
        Index = index;
    }
}

[My(250)]//特性允许类和属性的使用
class Class1
{
    [My(0)][My(1)]//AllowMultiple允许多个
    public int A;
    [My(2)]
    public bool B;
}

class Class2 : Class1
{
    //Inherited允许类继承特性内容,false时不会有Class1的特性
}

static void Main(string[] args)
{
    //通过反射获取特性的类容,根据实际需要做不同处理
    Type t = typeof(Class1);
    MyAttribute attribute = t.GetCustomAttribute(typeof(MyAttribute)) as MyAttribute;
    Console.WriteLine("Class1的特性Index:" + attribute.Index);

    FieldInfo[] fieldInfos = t.GetFields();

    foreach (var i in fieldInfos)
    {
        object[] mys = i.GetCustomAttributes(false);
        foreach (var j in mys)
        {
            MyAttribute my = j as MyAttribute;
            Console.WriteLine(i.Name + "的特性Index:" + my.Index);
        }
    }

    Console.WriteLine();Console.WriteLine("继承的类也有特性");
    t = typeof(Class2);
    attribute = t.GetCustomAttribute(typeof(MyAttribute)) as MyAttribute;
    Console.WriteLine("Class2的特性Index:" + attribute.Index);

    fieldInfos = t.GetFields();

    foreach (var i in fieldInfos)
    {
        object[] mys = i.GetCustomAttributes(false);
        foreach (var j in mys)
        {
            MyAttribute my = j as MyAttribute;
            Console.WriteLine(i.Name + "的特性Index:" + my.Index);
        }
    }

    Console.ReadKey();
}
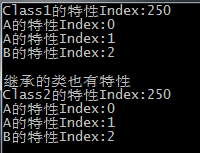
都挺简单的,解析看注释,输出:

Console.ForegroundColor = ConsoleColor.Blue;
Console.WriteLine(s);
Console.ForegroundColor = ConsoleColor.Red;
Console.WriteLine(s1);
只能设置,ConsoleColor枚举里面的颜色。
DataTable table = new DataTable();
Console.WriteLine(exp + "=" + table.Compute(exp, ""));

int a = 100;
string a16 = Convert.ToString(a, 16) ;
Console.WriteLine("100的二进制:"+Convert.ToString(a, 2));//ToString的第二个参数表示为进制的基数
Console.WriteLine("100的八进制:"+Convert.ToString(a, 8));
Console.WriteLine("100的十六进制:"+a16);
Console.WriteLine("16进制转换回10进制:"+Convert.ToInt32(a16, 16));