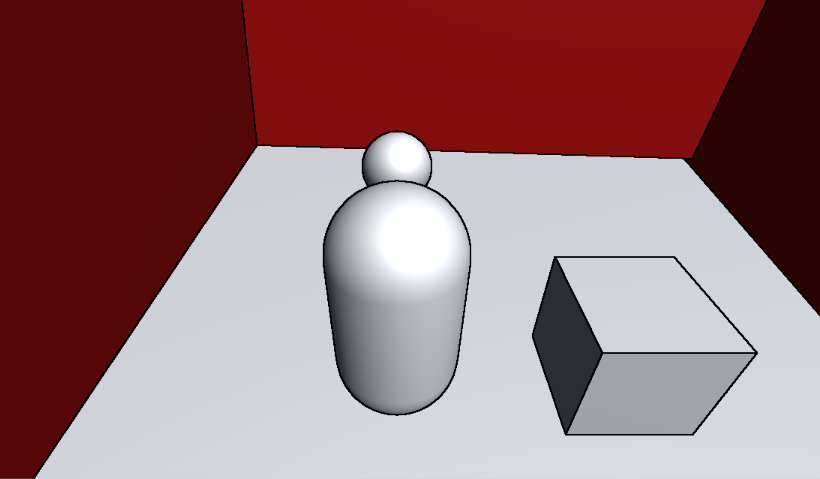
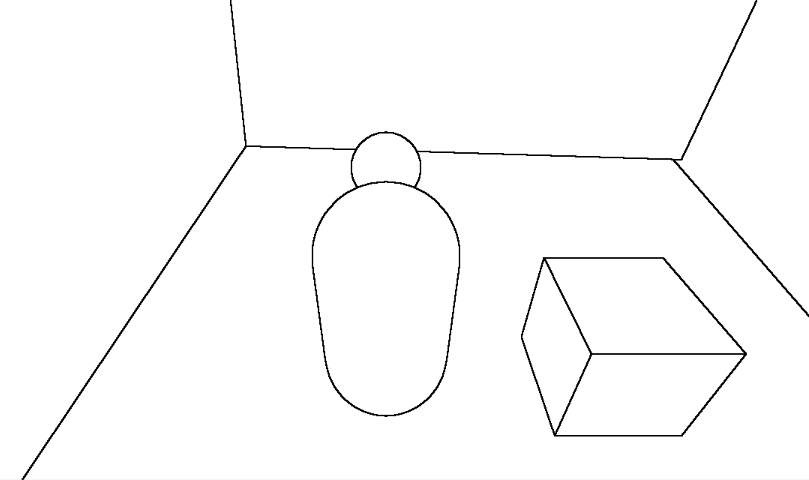
屏幕后处理-利用深度法线纹理来进行边缘检测-描边效果
使用Roberts算子来进行卷积计算,本质是计算左上角和右下角的差值*右上角和左下角的差值来作为边缘评估的依据。在计算中,我们评估对比(左上角和右下角)、(左下角和右上角)的法线值和深度值的差异都超过某个阔值,就认为这里就是一条边缘。
using UnityEngine;

public class MiaoBianTwo : MonoBehaviour {

    public Material mat;

    [Range(0.0f, 1.0f)]
    public float edgesOnly = 0.0f;//是否只显示边缘
    public Color backgroundColor = Color.white;//只显示边缘时的背景颜色
    public Color edgeColor = Color.black;//描边的颜色
    public float sampleDistance = 1.0f; //卷积取样的距离,越大描边会越大
    public float sensitivityDepth = 1.0f;//深度值的阔值控制
    public float sensitivityNormals = 1.0f;//法线的阔值控制

    private void OnEnable()
    {
        this.GetComponent<Camera>().depthTextureMode |= DepthTextureMode.DepthNormals;
    }

    [ImageEffectOpaque]
    private void OnRenderImage(RenderTexture source, RenderTexture destination)
    {
        if (mat != null)
        {
            mat.SetFloat("_EdgeOnly", edgesOnly);
            mat.SetColor("_EdgeColor", edgeColor);
            mat.SetColor("_BackgroundColor", backgroundColor);
            mat.SetFloat("_SampleDistance", sampleDistance);
            mat.SetVector("_Sensitivity", new Vector4(sensitivityNormals, sensitivityDepth, 0f, 0f));
            Graphics.Blit(source, destination, mat);
        }
        else
        {
            Graphics.Blit(source, destination);
        }
    }
}
Shader "Unlit/MiaoBianTwo"
{
Properties
{
_MainTex ("Texture", 2D) = "white" {}
_EdgeOnly("Edge Only",Float) = 1.0
_EdgeColor("Edge Color",Color) = (0,0,0,1)
_BackgroundColor("Background Color",Color) = (1,1,1,1)
_SampleDistance("Sample Distance",Float) = 1.0
_Sensitivity("Sensitivity",Vector) = (1,1,1,1)
}
SubShader
{
Tags { "RenderType" = "Opaque" }
LOD 100
CGINCLUDE
sampler2D _MainTex;
half4 _MainTex_TexelSize;
fixed _EdgeOnly;
fixed4 _EdgeColor;
fixed4 _BackgroundColor;
float _SampleDistance;
half4 _Sensitivity;
sampler2D _CameraDepthNormalsTexture;
#include "UnityCG.cginc"
struct v2f {
float4 pos : SV_POSITION;
half2 uv[5]:TEXCOORD0;
};
v2f vert(appdata_img v)
{
v2f o;
o.pos = UnityObjectToClipPos(v.vertex);
half2 uv = v.texcoord;
o.uv[0] = uv;
#if UNITY_UV_STARTS_AT_TOP
if (_MainTex_TexelSize.y < 0)
uv.y = 1 - uv.y;
#endif
o.uv[1] = uv + _MainTex_TexelSize.xy * half2(1, 1) * _SampleDistance;//右上角
o.uv[2] = uv + _MainTex_TexelSize.xy * half2(-1, -1) * _SampleDistance;//左下角
o.uv[3] = uv + _MainTex_TexelSize.xy * half2(-1, 1) * _SampleDistance;//左上角
o.uv[4] = uv + _MainTex_TexelSize.xy * half2(1, -1) * _SampleDistance;//右下角
return o;
}
//对比两点深度值和法线值的差异
half CheckSame(half4 center, half4 sample)
{
half2 centerNormal = center.xy;//法线不需要解包,这里只需要对比差异
float centerDepth = DecodeFloatRG(center.zw);
half2 sampleNormal = sample.xy;
float sampleDepth = DecodeFloatRG(sample.zw);
//控制阔值的值越小,差异化就会就越小,边缘就越少
half2 diffNormal = abs(centerNormal - sampleNormal) * _Sensitivity.x;
int isSameNormal = (diffNormal.x + diffNormal.y) < 0.1; //差异小于0.1,
float diffDepth = abs(centerDepth - sampleDepth) * _Sensitivity.y;
int isSameDepth = diffDepth < 0.1 * centerDepth;
return isSameDepth * isSameNormal ? 1.0 : 0.0;
}
fixed4 fragRobertsCrossDepthAndNormal(v2f i):SV_Target
{
half4 sample1 = tex2D(_CameraDepthNormalsTexture,i.uv[1]);
half4 sample2 = tex2D(_CameraDepthNormalsTexture, i.uv[2]);
half4 sample3 = tex2D(_CameraDepthNormalsTexture, i.uv[3]);
half4 sample4 = tex2D(_CameraDepthNormalsTexture, i.uv[4]);
half edge = 1.0;
edge *= CheckSame(sample1, sample2);
edge *= CheckSame(sample3, sample4);
//edge为1表示差异化小,显示原来颜色,为0表示为描边颜色
fixed4 withEdgeColor = lerp(_EdgeColor, tex2D(_MainTex, i.uv[0]), edge);
fixed4 onlyEdgeColor = lerp(_EdgeColor, _BackgroundColor, edge);
return lerp(withEdgeColor, onlyEdgeColor, _EdgeOnly);
}
ENDCG
Pass
{
ZTest Always Cull Off ZWrite Off
CGPROGRAM
#pragma vertex vert
#pragma fragment fragRobertsCrossDepthAndNormal
ENDCG
}
}
Fallback Off
}
