对比Z轴对当前所在的Layer的Z偏移,计算出缩放值,对位置和大小进行偏移
public float GetKeep2DShowAt3DCameraRatio(UILayerNames name, float elementWorldZ)
{
    var camera = GetCameraByLayer(name);
    if (camera.orthographic)
    {
        return 1.0f;
    }
    var layer = GetLayer(name);
    return elementWorldZ / layer.transform.position.z;
}
using Frame.Runtime;
using Frame.Runtime.UI;
using UnityEngine;
public class Adapt3DCameraTo2DViewScaleAndPos : UIMonoViewComponent
{
private Vector3 __OriginScale;
private Vector3 __OriginPosition;
public override void OnCreated()
{
__OriginScale = rectTransform.localScale;
__OriginPosition = rectTransform.position;
if (rectTransform.localPosition.z == 0)
{
return;
}
var ratio = Game.UI.GetKeep2DShowAt3DCameraRatio(LayerName, __OriginPosition.z);
//缩放
rectTransform.localScale = __OriginScale * ratio;
//位移
var newPos = __OriginPosition;
newPos.y *= ratio;
newPos.x *= ratio;
rectTransform.position = newPos;
}
public override void Dispose()
{
base.Dispose();
if (rectTransform.localPosition.z == 0)
{
return;
}
rectTransform.localScale = __OriginScale;
rectTransform.position = __OriginPosition;
}
}写入模板id
using System.Collections;
using System.Collections.Generic;
using UnityEngine;
using Frame.Runtime.UI;

public class CardStencil : UIMonoViewComponent
{
    [SerializeField]
    private Material m_Material;
    [SerializeField] private int m_ID = 1;

    private void Start()
    {
        GetComponent<MeshRenderer>().material = m_Material;
        SetStencilID(m_ID);
    }

    public void SetStencilID(int id)
    {
        m_ID = id;
        GetComponent<Renderer>().material.SetInt("_ID", id);
    }
}
材质使用的shader是
Shader "Unlit/Mask"
{
    Properties
    {
        _ID("_ID",int) = 1
    }
        SubShader
        {
             Pass
             {
                 Tags{ "RenderType" = "Opaque" "Queue" = "Geometry-1" }
                 ColorMask 0
                 ZWrite off
                 ZTest off
                 Stencil
                 {
                     Ref[_ID]
                     Comp always
                     Pass replace //替换相同ID模板像素
                 }
                 CGINCLUDE
                 struct appdata {
                     float4 vertex : POSITION;
                 };
                 struct v2f {
                     float4 vertex : SV_POSITION;
                 };
                 v2f vert(appdata v) {
                     v2f o;
                     return o;
                 }
                 half4 frag(v2f i) : SV_Target{
                     return 0;
                 }
                 ENDCG
             }
        }
}
2.为卡片后面的3D内容添加模板剪裁
using UnityEngine;
public class RectMaskItem3D : MonoBehaviour
{
    [SerializeField]
    private int m_ID = 1;
    [SerializeField]
    private MaskType m_Type = MaskType.Always;

    public MaskType type
    {
        get { return m_Type; }
        set
        {
            if (value != m_Type)
            {
                m_Type = value;
                Refresh();
            }
        }
    }

    public int id
    {
        get { return m_ID; }
        set
        {
            if (value != m_ID)
            {
                m_ID = value;
                Refresh();
            }
        }
    }

    private void Start()
    {
        Refresh();
    }

    void Refresh()
    {
        foreach (var render in GetComponentsInChildren<Renderer>(true))
        {
            render.material.SetInt("_ID", m_ID);
            render.material.SetInt("_StencilComp", (int)m_Type);
        }
    }

    public enum MaskType : byte
    {
        Always = 8,
        Equal = 3
    }

}
3D使用的shader需要添加模板测试的相关字段和内容 标记为add的为添加内容
利用模板id不同可以做多张卡牌,使其互相不受影响
例如:
// Unity built-in shader source. Copyright (c) 2016 Unity Technologies. MIT license (see license.txt)

// Unlit alpha-blended shader.
// - no lighting
// - no lightmap support
// - no per-material color

Shader "Custom/Unlit/Transparent" {
Properties {
    _MainTex ("Base (RGB) Trans (A)", 2D) = "white" {}
	//----add----
	_ID ("_ID",int) = 1
	_StencilComp ("_StencilComp",int) = 8
	//----add----
}

SubShader {
    Tags {"Queue"="Transparent" "IgnoreProjector"="True" "RenderType"="Transparent"}
    LOD 100

    ZWrite Off
    Blend SrcAlpha OneMinusSrcAlpha

    Pass {
		//----add----
		Stencil
		{
			Ref [_ID]
			Comp [_StencilComp]
			Pass keep
		}
		//----add----

        CGPROGRAM
            #pragma vertex vert
            #pragma fragment frag
            #pragma target 2.0
            #pragma multi_compile_instancing

            #include "UnityCG.cginc"

            struct appdata_t {
                float4 vertex : POSITION;
                float2 texcoord : TEXCOORD0;
                UNITY_VERTEX_INPUT_INSTANCE_ID
            };

            struct v2f {
                float4 vertex : SV_POSITION;
                float2 texcoord : TEXCOORD0;
                UNITY_VERTEX_OUTPUT_STEREO
            };

            sampler2D _MainTex;
            float4 _MainTex_ST;

            v2f vert (appdata_t v)
            {
                v2f o;
                UNITY_SETUP_INSTANCE_ID(v);
                UNITY_INITIALIZE_VERTEX_OUTPUT_STEREO(o);
                o.vertex = UnityObjectToClipPos(v.vertex);
                o.texcoord = TRANSFORM_TEX(v.texcoord, _MainTex);
                return o;
            }

            fixed4 frag (v2f i) : SV_Target
            {
                fixed4 col = tex2D(_MainTex, i.texcoord);
                return col;
            }
        ENDCG
    }
}

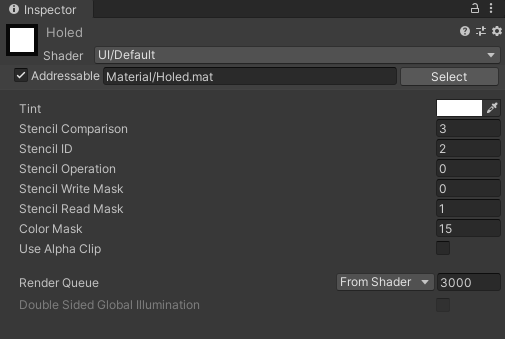
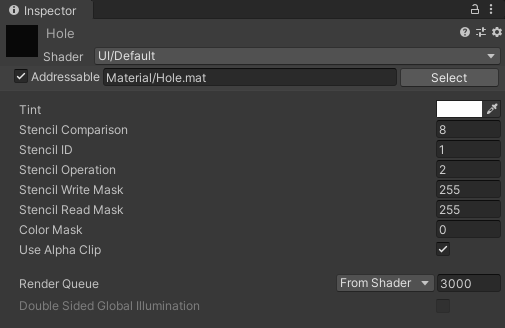
}一、准备两个材质
①被挖洞材质

②挖洞材质

二、使用

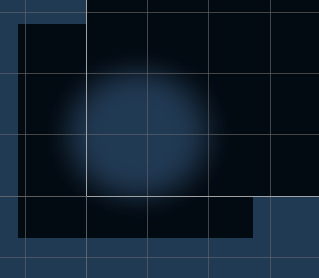
挖洞的要比被挖洞的层次低,挖洞效果为方方正正的,如果有别的形状效果的挖洞,可以在后面的层次中使用美术的图进行美化,只要边缘颜色和被挖洞的颜色相近即可。
例如

一般的修改内存等的作弊手段都是通过界面上的数值去查找地址的。所以定义一个新的结果体来替换原来的数据类型,保存值的时候做相应的随机偏移,重载基本运算方法等等就可以保证视觉上的数值在内存中搜索不到了。
有些游戏需要通过一定的物理运动并且达到相应的结果。可以准备两套相应的物体,一套绑定上相应的物理组件,一套单纯的物体。
物理组件那套不让相机渲染,默默在后面工作,通过物理引擎驱动运动,在FixedUpdate中记录相应的位置和角度,生成轨迹数据,在生成轨迹数据列表。
单纯物体那套,通过事先生成好的数据做规定的插值运动,既可以达到很好的物理效果。角度问题可以通过加上一个父物体解决,子物体进行做偏移纠最总的角度不对。如果不想显得那么突兀,子物体的纠正可以在轨迹运动的时间内做插值纠正。
一、记录物理运动的帧数据
void FixedUpdate()
{
    if (!isStartinng)
        return;

    if (Time.unscaledTime - preGenerateTime >= generateFrameTime)
    {
        RecordFrame();//隔一段时间记录数据
        preGenerateTime = Time.unscaledTime;
    }
}

private void RecordFrame(bool isStart = false)
{
    FrameData data = new FrameData();
    bool isColliderWall = false;
    for (int i = 0; i < Count; i++)
    {
        data.poss[i] = Cubes[i].transform.localPosition;
        data.rots[i] = Cubes[i].transform.rotation;
        if (!isStart)
        {
            if (i == 0)
            {
                data.isStop = Cubes[i].IsStop();
            }
            else
            {
                data.isStop = data.isStop && Cubes[i].IsStop();
            }

            if (Cubes[i].IsCollideWall())
                isColliderWall = true;
        }
    }

    data.time = Time.unscaledTime - recodeStartTime;
    curRecordData.frames.Add(data);
    if (data.isStop || isColliderWall)
    {
        bool is_correct = true;
        for (int i = 0; i < colorGameCubes.Count; i++)
        {
            curRecordData.tops[i] = Cubes[i].GetUpIndex();//物理结果的索引
            if (!Cubes[i].CheckUpCorrect())
            {
                is_correct = false;
            }
        }

        if (is_correct)
        {
            aniDatas.Add(curRecordData);
            genCount--;
            isStartinng = false;
            GenerateData();//继续生成
        }
        else
        {
            isStartinng = false;
            GenerateData();//继续生成
        }
    }
}
二、使用物理运动数据
//角度纠正
public void SetTargetIndexAndColor(int targetIndex, string color)
{
    ResetToOrigin();
    var colorData = GetDataByColor(color);//不旋转时结果的角度
    var tartgetData = GetDataByIndex(targetIndex);//物理运动结果的角度

    Quaternion q = Quaternion.FromToRotation(colorData.dir, tartgetData.dir);//将结果颜色那一面旋转到物理运动结果的那一面
    obj.localEulerAngles = q.eulerAngles;
}

//运动
void FixedUpdate()
{
    if (AniData == null)
        return;
    tmp_time = Mathf.Clamp01( ( curPlayTime - preData.time) / (curData.time - preData.time));//计算两记录帧之间的时间进度
    SetFrame(tmp_time);
    if (curPlayTime >= curData.time)
    {
        if (curData.isStop)
        {
            AniData = null;
            if (aniEndCallback != null)
            {
                aniEndCallback();
            }
        }
        else
        {
            curFrame++;
            preData = AniData.frames[curFrame - 1];
            curData = AniData.frames[curFrame];
        }
    }
    curPlayTime += Time.fixedDeltaTime;
}

void SetFrame(float t)
{
    for (int i = 0; i < cubeCount; i++)
    {
        CubeList[i].transform.localPosition = Vector3.Lerp( preData.poss[i],curData.poss[i],t );
        CubeList[i].transform.rotation = Quaternion.Lerp(preData.rots[i], curData.rots[i], t);
    }
}
三、记录一些方法
//刚体判断是否停止
public bool IsStop()
{
    if (Time.unscaledTime - start_time < 1)
    {
        return false;
    }
    bool isStop = rgBody.velocity.magnitude < (0.001f * 0.001f);
    return isStop;
}--[[
--CurTime为当前时区转换的时间戳
CurTime - SetTimezone = SetTime - CurTimezone
CurTime - SetTime = SetTimezone - CurTimezone
SetTime = CurTime - (SetTimezone - CurTimezone)
--总结:使用当前时区变成的时间戳需要-offset转换成设置时区对应点数的时间戳
例如东八区的0点,转换为东7区的0点,需要-(7*3600 - 8*3600)
--NormalTime为服务器传过来的标准时间戳
NormalTime - CurTimezone = SetTime - SetTimezone
SetTimezone - CurTimezone = SetTime - NormalTime
SetTime = NormalTime + (SetTimezone - CurTimezone)
--总结:标准时间戳需要+offset来得到设置时区对应点数
例如同一时间戳东八区转为8点,东七区为7点,但是按东八区来转,所以+(7*3600 - 8*3600)
注意一些获取当天0点的那些方法,有可能设置时区的当前0点并不是同一天
例如东八区的28号1点,但东七区是27号23点,所以需要加上偏移区获取0点,但获取到的0点也是当前时区的0点的时间戳,只是有可能日不一样
]]
function M:GetTimezoneOffsetSec()
if not self.timezoneOffsetSec then
local curTimeZoneSec = os.difftime(os.time(), os.time(os.date("!*t", os.time())))
local hour,min = math.modf( 7 ) --东7区
local min = min * 100
local setTimeZoneSec = hour * 3600 + min * 60
self.timezoneOffsetSec = setTimeZoneSec - curTimeZoneSec
end
return self.timezoneOffsetSec
end
int FrameRate = 30;//多少帧
float MoveDistance = 2f;//移动多少距离
string MaterialPrefabPath = "Prefabs/Effect_biaoqing_prefab/";
IEnumerator StartMateriaAni(byte index,byte fromViewID,byte toViewID)
{
    Vector3 startPos = poss[fromViewID].position + offsetPos;
    Vector3 toPos = poss[toViewID].position + offsetPos;

    //方向 向上减速 向下加速
    bool isDown = false;
    if (startPos.y > toPos.y)
        isDown = true;

    float rate = (toPos - startPos).magnitude / MoveDistance;//缩放比例
    int relateFrame = (int) Mathf.Round (FrameRate * rate);//实际帧数/期望帧数 = 实际距离/期望距离
    if (relateFrame < 20)//距离太近可能看起来会太快,所以限制下最低帧数
            relateFrame = 20;
    int allDuan = (1 + relateFrame) * relateFrame / 2; // 1 + 2 + ...+ realteFrame
    float tweenPosY = (toPos.y - startPos.y) / allDuan;//Y轴减速度或加速度
    float tweenPosX = (toPos.x - startPos.x) / relateFrame;//X轴恒速

    //实例化1
    Transform tran1 = GetEffectInPool(index,1).transform;
    InitEffect(tran1, startPos);
    //计算旋转
    tran1.rotation = Quaternion.FromToRotation(Vector3.up, (toPos - startPos).normalized); ;
    for (int i = 0; i < relateFrame; i++)
    {
        //x方向恒速,y方向先快后慢或先慢后快,效果承抛物线
        if(isDown)
            tran1.position += new Vector3(tweenPosX, tweenPosY * (i + 1), 0);
        else
            tran1.position += new Vector3(tweenPosX, tweenPosY  * (relateFrame - i),0) ;
        tran1.rotation = Quaternion.FromToRotation(Vector3.up, (tran1.position - startPos));
        yield return new WaitForEndOfFrame();
    }
    InEffectInPool(tran1.gameObject);//回收

    //实例化2
    Transform tran2 = GetEffectInPool(index, 2).transform; ;
    InitEffect(tran2, toPos);
    switch (index)//针对动作延迟播放shengyin
    {
        case 1:
            yield return new WaitForSeconds(0.5f);
            break;
    }
    NGUITools.PlaySound(musics[index - 1]);

    yield return new WaitForSeconds(3f);
    InEffectInPool(tran2.gameObject);
}
想法就是,利用期望帧数和期望距离和实际距离来计算出实际的帧数,这样可以接近一种恒速(不确定)。避免了用if判断位置到目标位置的不精确性。利用这种目标和起始的位置来分段,在固定的帧内移动到目标位置,在Y方向时分端可以分多一点,开始的时候移动多段随后减少就可以制造一种减速度的感觉 或者是 开始移动少段随后变多制造出加速的感觉。
已知到可以创建一个RenderTexture赋值给Camera后,就可以将这个Camera渲染的内容填充到这个RenderTexture中了。但是这是针对某个相机的,如果是要显示多个相机的,就不能这样子做了,办法就是在层次较高的相机上加上后处理方法OnRenderImage,然后将source(RenderTexture)转换为Texture2D,然后赋值给用来显示的UITexture就可以了。为什么不直接把source直接赋值给UITexture,因为我试过了,Editor上是正常的,到手机上就会显示所有相机渲染后的内容,然后就会产生镜像的叠加。
using System.Collections;
using UnityEngine;

public class CreateMJShareTex : MonoBehaviour {

    public UITexture tex;
    private bool isTurnTexture = false;

    private void OnEnable()
    {
        StartCoroutine(WaitOne());
    }

    IEnumerator WaitOne()
    {
        yield return new WaitForEndOfFrame();
        isTurnTexture = true;
    }

    private void OnRenderImage(RenderTexture source, RenderTexture destination)
    {
        if (isTurnTexture)
        {
            RenderTexture curTex = RenderTexture.active;
            Texture2D tex2d = new Texture2D(source.width, source.height);
            RenderTexture.active = source;
            tex2d.ReadPixels(new Rect(0, 0, source.width, source.height), 0, 0);
            tex2d.Apply();
            RenderTexture.active = curTex;
            tex.mainTexture = tex2d;
            isTurnTexture = false;
        }

        Graphics.Blit(source, destination);
    }
}
有那么一种需求,就是将NGUI的UITexture.mainTexture或RawImage.mainTexture内容保存成一张图片,因为mainTexture是Texture类型,没有可以保存的方法,所以需要转换成Texture2D。方法就是先将Texture转换到RenderTexture,然后渲染到缓存池中,再用Texture2D去读取出来。
//将Texture转换为Texture2D
public Texture2D TexToTex2D(Texture t)
{
    Texture2D tex2d = new Texture2D(t.width, t.height, TextureFormat.RGBA32, false);
    RenderTexture currentRT = RenderTexture.active;//临时保存原来的渲染目标
    RenderTexture renTex = RenderTexture.GetTemporary(t.width, t.height, 32);//获取临时渲染纹理
    Graphics.Blit(t, renTex);//将Texture渲染到RenderTexture

    RenderTexture.active = renTex;
    tex2d.ReadPixels(new Rect(0, 0, renTex.width, renTex.height), 0, 0);
    tex2d.Apply();

    RenderTexture.active = currentRT;
    RenderTexture.ReleaseTemporary(renTex);

    return tex2d;
}
