using UnityEngine;
using System.Collections;
public class LogTEST : MonoBehaviour {

    void Start () {
        //在一个日志信息上注册一个委托来被调用
        Application.RegisterLogCallback (MyLogCallback);
    }


    /// log callback check
    /// </summary>
    /// <param name="condition">log内容.</param>
    /// <param name="stackTrace">log产生的栈数据追踪</param>
    /// <param name="type">log的类型.</param>
    void  MyLogCallback (string condition, string stackTrace, LogType type){}
}
在MyLogCallback里面会接受到所有的Debug输出的日志,我们可以在这里整合信息,保存起来,然后使用GUI显示出来,实现一个运行时的Console。也可以使用WWWForm来发送错误报告,在服务端生成多用户的日志报告,分析情况等。
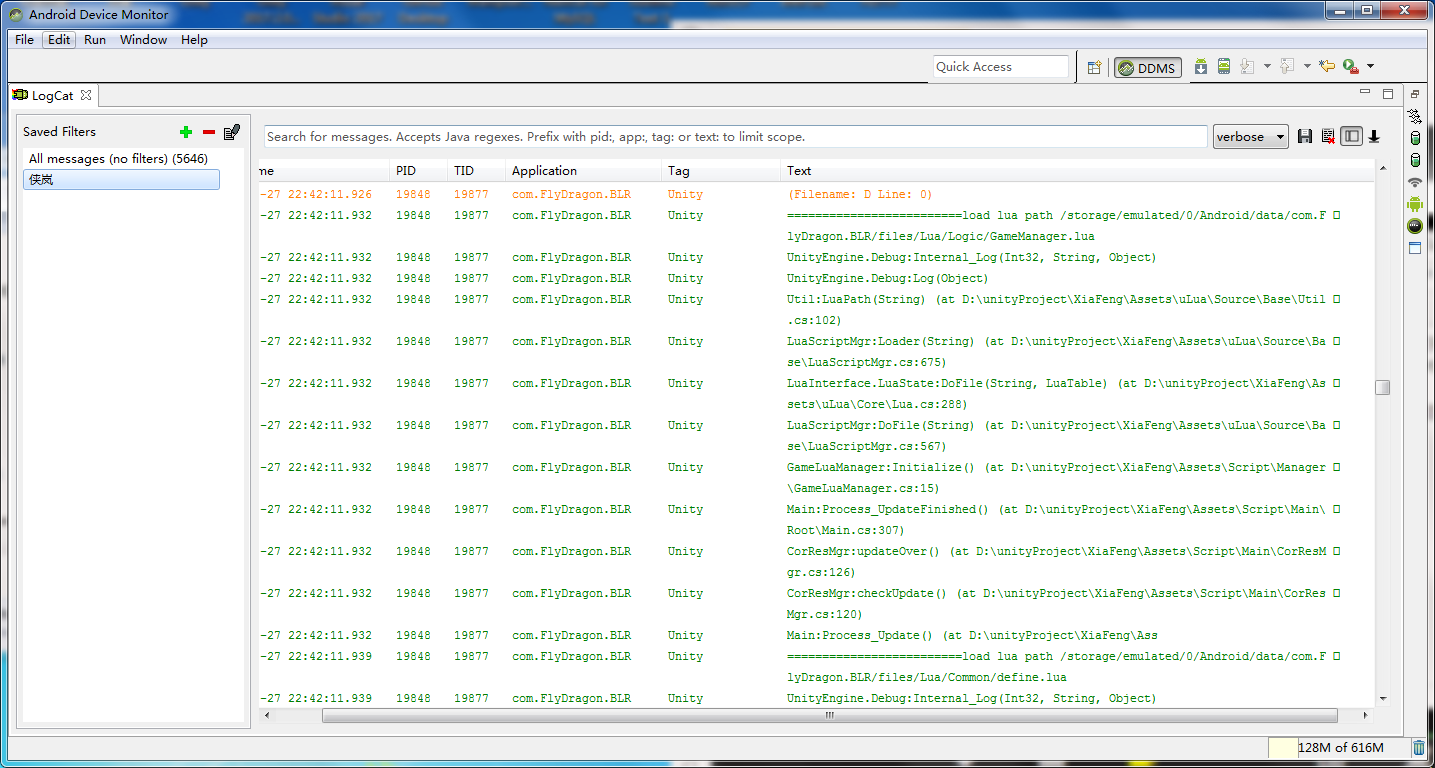
在android-sdk的包中有一个tools工具文件夹,可以双击打开monitor.bat或则是ddms.bat,就会打开一个叫AndroidDeviceMonitor的调试工具,有一个LogCat就是捕捉输出的日志的,他会捕捉android上一切的活动,所以需要新建一个Filter设置Tags为Unity,就可以只看Unity游戏的相关日志了。
在手机上安装好打包后的游戏(开发模式),开启开发者模式的Usb调试,用数据线连接上电脑,然后打开游戏,切换到你游戏的Filter,你就可以看到日志的输出了。

AssetBundle通过Load方法加载资源的时候,是从内存的镜像文件加载成内存的对象,当AssetBundle通过UnLoad(false)卸载资源的时候已经加载出来的资源对象是不会被释放的(只释放镜像内存),需要程序去管理起来了,通过Resource.UnLoad(prefab)卸载掉。
[Test]
[UnityPlatform (RuntimePlatform.WindowsPlayer)]//单个
public void TestMethod1()
{
   Assert.AreEqual(Application.platform, RuntimePlatform.WindowsPlayer);
}

[Test]
[UnityPlatform(exclude = new[] { RuntimePlatform.WindowsEditor })]//多个
public void TestMethod2() {
    Assert.AreEqual(Application.platform, RuntimePlatform.WindowsEditor);
}
UnityPlatform指定在哪些平台才会运行这些测试代码。
[Test]
public void LogAssertExample()
{
    //指定一些Log的信息
    LogAssert.Expect(LogType.Log, "Log message");
    //如果输出的信息不是这一句,就会测试不通过
    Debug.Log("Log message");//可以通过

    Debug.LogError("Error message");
    //如果没有下面这一条,上面这一条就会导致测试不通过了
    LogAssert.Expect(LogType.Error, "Error message");
}
看注释。
[Test]
public void GameObject_CreatedWithGiven_WillHaveTheName()
{
    //一条龙直接往下的
    var go = new GameObject("MyGameObject");
    Assert.AreEqual("MyGameObject", go.name);
}

[UnityTest]
public IEnumerator TestMono()
{
    //需要等待
    yield return new MonoBehaviourTest<MonoSSS>();
}

public class MonoSSS : MonoBehaviour,IMonoBehaviourTest
{
    public bool IsTestFinished
    {
        get
        {
            if (index == 100) return true;
            return false;
        }
    }
    int index = 0;

    void Update()
    {
        index++;
    }
}
Test的测试方法是挺简单的,一般就是将对应需要测试的类实例化一下,然后调用你要测试的方法,最后Assert断言验证数据的正确性。
UnityTest测试的是一个MonoBehaviour的脚本,MonoBehaviourTest返回的是一个IEnumerator,然后等待MonoBehaviour测试的完成。
怎么识别MonoBehaviour脚本测试的完成,就是实现IMonoBehaviourTest接口的IsTestFinished,返回true就表示测试完了。
Test指定的测试,指定是void的方法,就是一条龙往下的测试代码,中间不需要等待的逻辑性代码,例如计算一些数据,工具类转化数据等等。
UnityTest,指定的是返回IEnumertor的方法,就是协程返回,这样就可以用来表示一些加载完资源后测试代码,加载网络消息的测试方法等等可以拥有等待状态。
Unity Test Runner是集成在Unity里面的单元测试,基于NUnit单元测试。使用方法:
在Unity菜单Window->TestRunner打开窗口。

可以看到分为两种模式,一种是PlayMode,一种是EditMode。
PlayMode是一种运行时测试的,就是你运行测试的时候会自动播放游戏的。如果说需要测试MonoBehaviour的脚本,一定得是PlayMode的。
EditMode就是在编辑器当中就可以运行的了,一些普通的脚本啊,一些扩展编辑器的脚本啊等等。
点击Create Test Assembly Folder,创建一个测试的程序集文件夹,会有一个Assembly Definition文件在文件夹里面,可以指定平台。
随后进入到文件夹里面,Create Test Script in current folder就可以用了,点击它,创建一个测试脚本。
using UnityEngine.TestTools;
using NUnit.Framework;
using System.Collections;

public class NewTestScript {

    [Test]
    public void NewTestScriptSimplePasses() {
        // Use the Assert class to test conditions.
    }

    // A UnityTest behaves like a coroutine in PlayMode
    // and allows you to yield null to skip a frame in EditMode
    [UnityTest]
    public IEnumerator NewTestScriptWithEnumeratorPasses() {
        // Use the Assert class to test conditions.
        // yield to skip a frame
        yield return null;
    }
}
可以发现使用到了UnityEngine.TestTools和NUnit.Framework。
这里面有两种特性,Test和UnityTest指定的不同的测试方法,在Unity Test Runner中可以看到了

双击就可以测试对应里面的测试代码了。
将这里生成的cs文件和工具箱中的protobuf-net.dll文件一起导入到Unity中,新建一个测试脚本开始序列化和反序列化测试。
using UnityEngine;
using item;
using System.IO;
using ProtoBuf;

public class Test : MonoBehaviour {
	void Start () {
        Item i = new Item();
        i.Type = 1;i.num = 10;i.SubType = 2;
        ItemList list = new ItemList();
        list.item.Add(i);

        byte[] data = Serialize(list);
        Debug.LogError(data.Length);//8

        ItemList ll = Deserialize<ItemList>(data);
        Debug.LogError(ll.item[0].num);//10

    }

    byte[] Serialize(object o)
    {
        using (MemoryStream ms = new MemoryStream())
        {
            Serializer.Serialize(ms, o);
            byte[] result = new byte[ms.Length];
            ms.Read(result, 0, result.Length);

            return result;
        }
    }

    T Deserialize<T>(byte[] data)
    {
        using (MemoryStream ms = new MemoryStream(data))
        {
            T t = Serializer.Deserialize<T>(ms);
            return t;
        }
    }
}
这里使用的Serializer是ProtoBuff命名空间里面的,主要使用它序列化数据在前面加上协议头(就是命令),然后传输过去给服务端,服务端根据协议头找到对应的结构(同一个.proto生成),反序列化(去除)数据
同样的,客户端也是根据服务端的协议头,找到对应的结构,在通过统一接口ProtoBuf反序列化取出数据。
百度搜索"ProtoBuff C#工具",下载编译好的工具集,当然的也可以自己去git上下载源码自己编译。
一、编写.proto文件,就是用来定义数据结构存储什么东西的。
package kongjian;//生成cs文件的命名空间
//import "other.proto";//可以引入其他的定义文件,两个结构其实可以分开两个文件的
message Item
{
	required int32 Type = 1;//required表示 必须
	optional int32 SubType = 2;//optional表示 可选
	required int32 num = 3;
}

message ItemList
{
	repeated Item item = 1;//表示数组,解析后为List
}
二、利用工具解析为中间文件(.protodesc)再解析为c#类脚本(.cs)
一个工具是protoc.exe,一个是protogen.exe,我的是进入到工具目录中操作的

三、看看解析成的cs文件类容
namespace item
{
  [global::System.Serializable, global::ProtoBuf.ProtoContract(Name=@"Item")]
  public partial class Item : global::ProtoBuf.IExtensible
  {
    public Item() {}

    private int _Type;
    [global::ProtoBuf.ProtoMember(1, IsRequired = true, Name=@"Type", DataFormat = global::ProtoBuf.DataFormat.TwosComplement)]
    public int Type
    {
      get { return _Type; }
      set { _Type = value; }
    }
    private int _SubType = default(int);
    [global::ProtoBuf.ProtoMember(2, IsRequired = false, Name=@"SubType", DataFormat = global::ProtoBuf.DataFormat.TwosComplement)]
    [global::System.ComponentModel.DefaultValue(default(int))]
    public int SubType
    {
      get { return _SubType; }
      set { _SubType = value; }
    }
    private int _num;
    [global::ProtoBuf.ProtoMember(3, IsRequired = true, Name=@"num", DataFormat = global::ProtoBuf.DataFormat.TwosComplement)]
    public int num
    {
      get { return _num; }
      set { _num = value; }
    }
    private global::ProtoBuf.IExtension extensionObject;
    global::ProtoBuf.IExtension global::ProtoBuf.IExtensible.GetExtensionObject(bool createIfMissing)
      { return global::ProtoBuf.Extensible.GetExtensionObject(ref extensionObject, createIfMissing); }
  }

  [global::System.Serializable, global::ProtoBuf.ProtoContract(Name=@"ItemList")]
  public partial class ItemList : global::ProtoBuf.IExtensible
  {
    public ItemList() {}

    private readonly global::System.Collections.Generic.List<Item> _item = new global::System.Collections.Generic.List<Item>();
    [global::ProtoBuf.ProtoMember(1, Name=@"item", DataFormat = global::ProtoBuf.DataFormat.Default)]
    public global::System.Collections.Generic.List<Item> item
    {
      get { return _item; }
    }

    private global::ProtoBuf.IExtension extensionObject;
    global::ProtoBuf.IExtension global::ProtoBuf.IExtensible.GetExtensionObject(bool createIfMissing)
      { return global::ProtoBuf.Extensible.GetExtensionObject(ref extensionObject, createIfMissing); }
  }

}
四、同理的,利用同一个.proto文件,可以生成不同平台使用,但是数据结构对应上的客户端文件和服务端文件,这就方便了命令数据结构的对应了。