读一读
1.项目目录
下载
npm i protobufjs
写入package.json
npm install --save protobufjs
下载并写入生成工具
npm i --save-dev protobufjs-cli
2.引入
import protobufjs from 'protobufjs';
3.解决引入报错 tsconfig.json文件中
 "compilerOptions": {
      "allowSyntheticDefaultImports": true, // 需要开启
  }
4.编写生成脚本 package.json 路径自己确定
"scripts": {
    "build-proto:pbjs": "pbjs --dependency protobufjs/minimal.js --target static-module --wrap commonjs --out ./Proto.js/proto.js ./Proto/*.proto",
    "build-proto:pbts": "pbts --main --out ./Proto.js/proto.d.ts ./Proto.js/*.js"
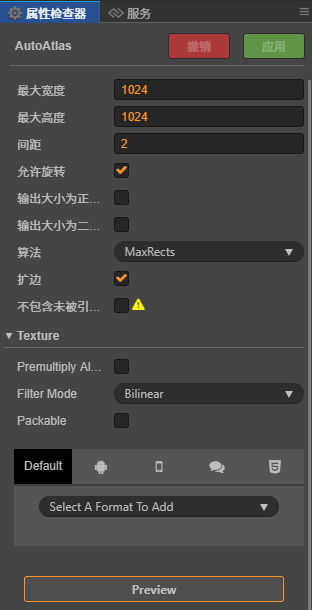
},在指定存放碎片图片的文件夹中右键创建一个《自动图集配置》,打包的时候就会将当前文件夹中的图片打包成一个图集,减少DC。优点就是不用事先使用TexturePacker去打包成图集,直接使用碎图进行开发,提高效率。

const {ccclass,property} = cc._decorator;

@ccclass
export default class NewClass extends cc.Component{
    onLoad(){
        //一定要在onLoad方法里面调用,start方法里面无效
        cc.director.getPhysicsManager().enabled = true
        cc.director.getPhysicsManager().gravity = cc.v2(0,-320)
    }
}
const {ccclass, property} = cc.decorator

@ccclass
export default class NewClass extends cc.Compont{
    @property(cc.Animation)
    animation:cc.Animation = null

    onLoad(){
        let animation = this.animation
        animation.on("play",this.onPlay,this)
        //stop lastframe finished pause resume
        //off 在onDestroy 关闭监听
    }
}
const {ccclass, property} = cc._decorator;

@ccclass
export default class NewClass extends cc.Component {

    checkBoxClicked(toggle:cc.Toggle) {
        console.log ("是否选择:" + toggle.isChecked)
    }

}
const {ccclass, property} = cc._decorator;

@ccclass
export default class NewClass extends cc.Component {

    @property(cc.Node)
    image: cc.Node
    @property(cc.AudioSource)
    music: cc.AudioSource
    @property(cc.Slider)
    slider_h: cc.Slider
    @property(cc.Slider)
    slider_v: cc.Slider

    onLoad () {
        this.slider_v.progress = 0.5;
        this.slider_h.progress = 0.5;
        this._updateImageOpacity(this.slider_v.progress);
        this._updateMusicVolume(this.slider_h.progress);
    }

    _updateImageOpacity (progress) {
        this.image.opacity = progress * 255;
    }

    _updateMusicVolume (progress) {
        this.music.volume = progress;
    }

    onSliderVEvent (sender, eventType) {
        this._updateImageOpacity(sender.progress);
    }

    onSliderHEvent (sender, eventType) {
        this._updateMusicVolume(sender.progress);
    }
}
<color=#ff0000>妈妈</c>再也<size=20>不用担心</size>
我在 <size=56><outline  width=4 color=#00ff00 click="clickme"><color=red>Creator</c></c></s> 里面
使用<color=#ff0000>五</c><color=#00ff00>彩</c><color=#00e0ff>缤</c><color=#ffff00>纷</>,
<size=20>大小</s><size=60>不一</s>
的<size=33>文字</s>了
再RichText组件下添加自己的脚本,声明clickme方法,当点击富文本的Creator时,该方法就会触发了
const {ccclass, property} = cc._decorator;

@ccclass
export default class NewClass extends cc.Component {

    @property(cc.ScrollView)
    scrollview:cc.ScrollView = null

    @property(cc.Node)
    itemPrefab:cc.Node = null

    @property(cc.Node)
    content:cc.Node = null

    start () {
        let itemNum = 20
        let space = this.content.getComponent(cc.Layout).spacingY
        //要重新计算内容的高度 内容添加一个Layout组件就不用自己设定高度位置
        //设置Layout的ResizeMode为自动计算大小也就不用自己计算内容大小了
        this.content.height = (this.itemPrefab.height + space) * itemNum
        for(let i = 0;i < itemNum;i++)
        {
            let item = cc.instantiate(this.itemPrefab)
            this.content.addChild(item)
            item.x = 0
        }

        let action = new cc.Tween()
        action.target(this).delay(5).call(()=>{
            //2秒滑动到指定位置
            this.scrollview.scrollToOffset(new cc.Vec2(0,800),2)
        }).start()
    }
}
const {ccclass, property} = cc._decorator;

@ccclass
export default class NewClass extends cc.Component {

    @property(cc.ProgressBar)
    bar:cc.ProgressBar = null

    pro:number = 0

    update (dt)
    {
        this.pro += dt / 10;
        if(this.pro > 1)
        {
            this.pro = 0
        }

        this.bar.progress = this.pro
    }
}
const {ccclass, property} = cc._decorator;

@ccclass
export default class NewClass extends cc.Component {

    onLoad ()
    {
        let lab:cc.Label = this.getComponent(cc.Label)
        lab.string = "哈哈哈哈哈哈哈"
        lab.horizontalAlign = cc.Label.HorizontalAlign.CENTER
        lab.fontSize = 33
    }
}